
XCode a Run Down of the Features of the IOS Integrated Development Environment
Slinging code is important. It’s the most important thing I do. I know that being aware and using the features of a good text editor or IDE makes me more productive, which in the end aids my overall goals. That is why I put a great deal of care in understanding and learning the ins and outs of tools that support me doing my work.
Whether it’s my text editor of choice (Sublime Text), or a development environment (Eclipse, Visual Studio). That is why in my journey to understand the iOS platform an important step is to learn about the tool that will assist me the most in that goal, Xcode.
What Is The Point In An Integrated Development Environments
I’m coming from the web and I see a lot of people saying that IDE are pointless/not the way to do things. I’ve said it myself. In previous positions I would always rather a clean text editor with clean editing concepts over a bloat mess of an IDE any day. I even debated the point of view that having an IDE made doing the wrong thing too easy (Eclipse Java auto-complete anyone?). I do sometimes feel that way, but I’ve seen badly written Java done using text editors as well as badly written Java using IDEs.
I’ve had more experienced programmers explain to me what they believe the true power behind an IDE really is. An IDE exists as a way of treating code not as symbols in a UTF8 text file, but as living breathing data that you can manipulate and interact with. An IDE is an extension of the the compiler/interpreter that understands your language. The compiler/interpreter spits out ASTs (abstract syntax trees) of the various parts of your program and the IDE can consume and use that to inform you of deep power things.
Xcode understands the relationship your code has to the rest of the underlaying framework. It can show you the right information at the right time to help you make the best and most informed decision.
The Editor Overview
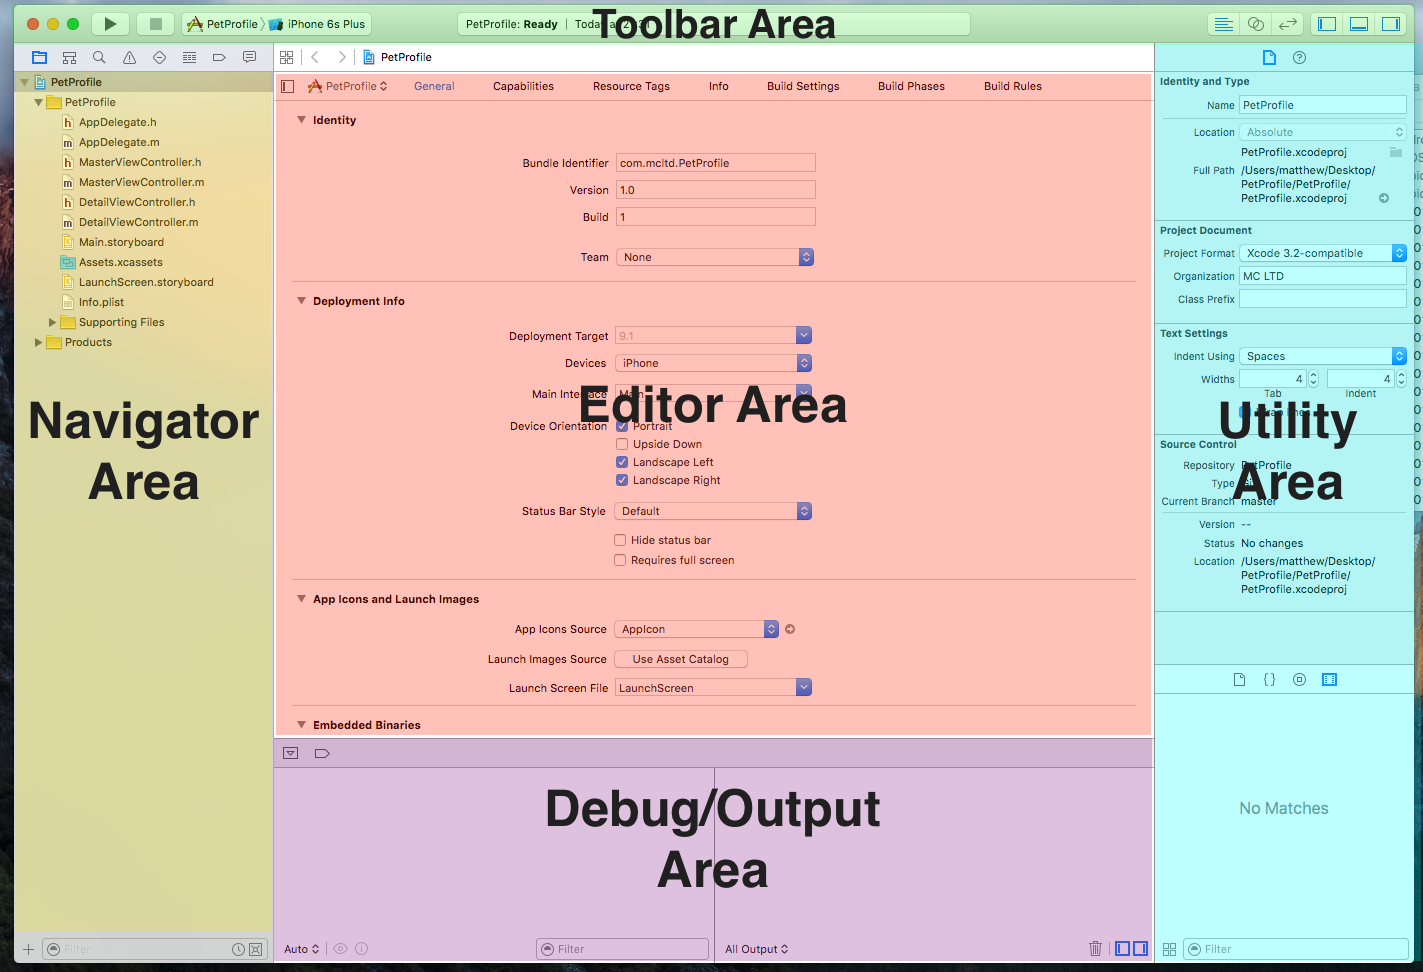
Arriving in to Xcode is overwhelming at first, as it can be with any reasonably complex development environment, but after a little while I started to get a sense of what was what, and where was where. There are a few main sections from what I can see:
- The toolbar
- The navigators
- The editors
- The debug/output area
- The utility area
Navigators
On the left hand side of the Xcode interface are the navigator tree interfaces. These are a collection of tabbed views that give me a high level insight into my application. The first and most important one is the Project Tree Navigator.
It does what you’d expect. It reads the structure of my code on disk and displays a tree to represent it. It provides me with a right click context menu as for file and folder operations.
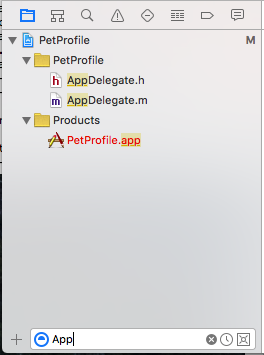
I noticed on the bottom of the navigator view you get a filter component which filters the tree to show you just the files you want. Which is a very useful features.
There are a few more navigators available in that view, but I probably won’t find them useful at first, but here is a list and a brief explanation:
- Symbol Navigator
- Code being made up of various high level concept/symbols like methods. This view provides me with an outline of these symbols.
- Find Navigator
- This is the global search in project view. Here I can search for text across all the different search-able text file formats that make up my project.
- Issue Navigator
- As I code I end up producing errors. As those errors accumulate they amass in here. A lot of editors have errors in a table view at the bottom of their interfaces. Xcode choose to put it to the left by default.
- Test Navigator
- As I writes test to to ensure the correctness of my code, they show up in this tabbed area.
- Debug Navigator
- Naturally there is where a lot of the debug information, current programming stack…etc appears.
- Breakpoint Navigator
- An interesting feature of Xcode is the ability to set a break point and have it remember that breakpoint between sessions (because it is keep in the project). This theoretically means I could check my breakpoints into source. I’m not sure how useful I’ll find that, but you never know.
- Report Navigator
- This is a basic event log of the various actions that took place through out that Xcode session. Like builds…etc
The Project Tree Does Not Represent What Is On Disk…
Just a side note on Xcode and projects. Even though it appears that I’m moving things around into folders in Xcode it doesn’t actually do that on disk. It only does that grouping into a folder in the Xcode project. My actually files will remain scattered around that main folder like I never organized anything.
I did happen upon a SO question which clears up how to approach this issue as I’m sure that I’m going to want to interact with the code outside Xcode (through Git command line…etc.) as well as inside it. It does seems a bit mad that it wouldn’t do a grouping on the files system as a way of representing these groupings, but I’m sure there was an original rational behind it that made sense to the development team.
Editor Area
Of all the pieces of Xcode I’ll need to understand the most, the editor area is the most important. It is where the ideas stream out of my head and into reality. The interface is split between it too main aims. Writing code and creating UIs.
Source Code Editing
As a text editor Xcode is pretty okay. I’m still getting used to it. I was quite frustrated at first, because I had gotten so used to the incredibly advanced features of tools like Sublime Text that I find it quite slow to create anything in it, but I’m sure I’ll get the hang of it soon and I’ll share those insights on this blog at a later date.
I liked the fact that the key bindings are all completely configurable which is handy. And it seems that you can import an XML document with those binding into and out of the editor. I’ll probably start to tweak these to something more suitable to my particular muscle memory over time. The other large element of this part of the editor seems to be the breadcrumb.
The breadcrumb is useful in a number of ways. Firstly it lets me get an outline of the specific file I am working with. It exposes object hierarchies if I am using a file which has inherited from another object, or perhaps implements an interface/protocol of some kind. It also shows logically connected files, like an interface and an implementation files if you are talking about Objective-C or an Storyboard view and a Swift file.
There is of course the usual features you’d expect here also like code folding, line numbering, comment toggle…etc
Interface Builder
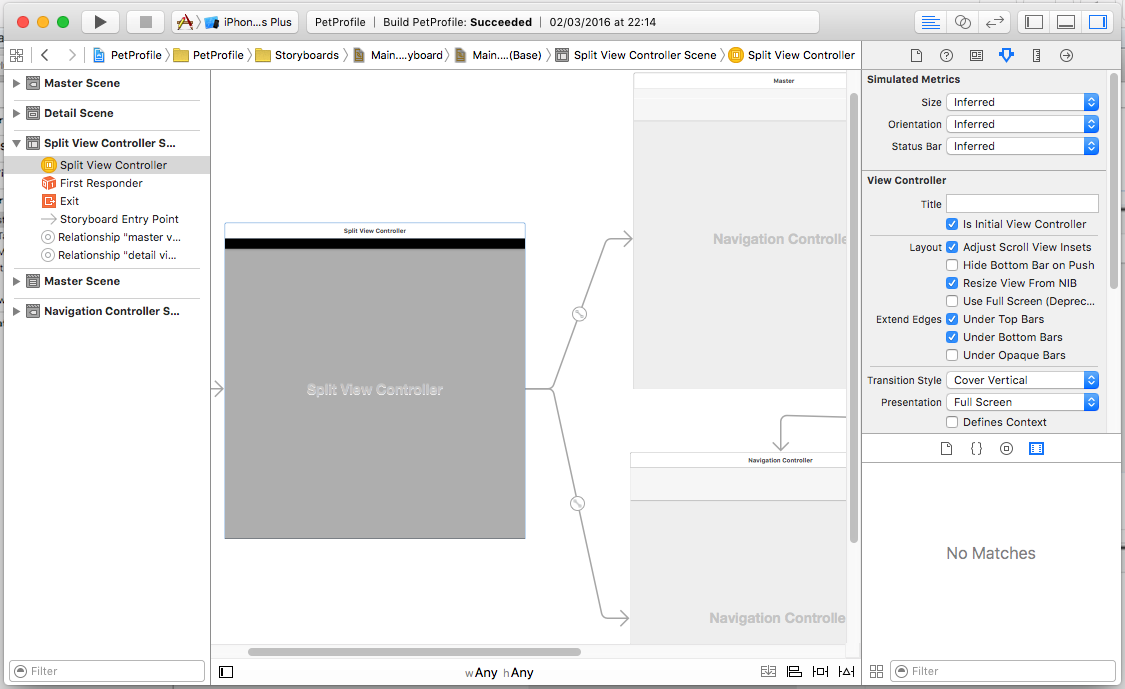
Interface Builder is an alternative editor view that does much more than designing interfaces through dragging and dropping components. Here are some of it’s responsibilities.
- UI component placement.
- Applying layout constraints (making the UI more responsive to different screen sizes).
- Designing interface navigation, how screen connect to one another.
- Wiring up my various views to their controllers so I can control their logic.
- A drag and drop method of exposing UI element extension points to my controllers.
There is clearly a lot going on here, and I’ll probably be digging deeper into this at a later date.
Utility Area
Like every application and every home there is a place where the little bits and pieces must live the utility area is that place for Xcode.
Property Pane
This is where various property dialogs are displayed for the file which is in focus (typically); items such as UI settings, styling, sizing…etc. All of the various contextual property elements find there way into this area.
Library Pane
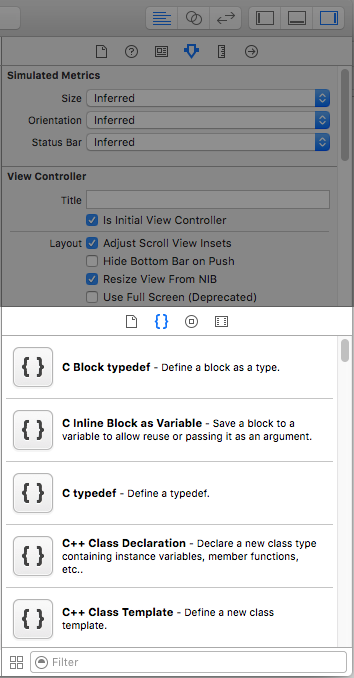
The library pane is where I can do lot of different little things. There are various sub sections such as:
- There’s a file creation drawer, where I can drag and drop a file type to quickly create new files.
- There is a code snippet view, where I can drag and drop various code snippets I’ll collect into the text editor.
- A UI component drawer, where I can drag and drop UI elements into the Storyboard to work into my application designs.
- Media Library drawer, where I can get a quick view of the various pieces of media (like images…etc) currently present in my project.
The Toolbar
The next section of the editor that I said I’d look at is the toolbar. What I find interesting about the toolbar is that it take a few designs/nods from iTunes. You have large controls to the left and right the control an overall operation, while in the center you have a currently active operation/progress bar. It’s a nice touch and make it easy enough to understand the intents of the toolbar at a glance (if you’ve previously used iTunes).
It’s primary role would be context switching. Switching to the context of running your application, stopping it. Changing the current editor type.
Run Controls
The main run controls allow me to kick off my app in the simulator/emulator mode. It even allows me to choose different target devices to run against (iPhone, iPad…etc). Being able to switch these quick seems quick hand if I were to be targeting multiple devices.
Views

The view buttons allow me to move between different editing contexts.
- Standard - A single files, no fancy stuff. Just plain Storyboard or code files.
- Assistant - A split view where I might have related files opposite one another (Objective-C interface and implementation for instance). It appears you can have multiple split panes as well. So you could go crazy if you had a large enough monitor.
- Source Control - A source control view, looks like it would be handy for viewing file diffs…etc.
Pane Switches

The final elements in the toolbar are the pane toggle buttons. These are a quick and convenient way hidden unnecessary parts of the UI. In the version of Xcode I’m using (7.1) the buttons have a visual impression of the pane section that they hide.
Debug/console Area
Finally, there is the debug output area. I’ve done some debugging and seen the stack trace there, I’ve played with inspecting variables/objects and done some print debug. It’s pretty much what I’d expect.
Advanced Features
Finally finally, there are the advanced features that it’ll be a while before I really get my teeth into.
Build Technology
There is a whole build system technology build directly into Xcode. I must properly investigate this before writing about it. I don’t like build technology that I can’t automate. If I can’t produce a set of build steps that I can then run on some sort of continuous integration server (at the very least on a nightly task, perhaps on a different user account) then I think I’ll look at some other method to build my applications.
Others
- Behaviors - These seem to be very high level events that I’m not entirely sure why you’d want to configure/change. You can configure Xcode to bring certain views into focus when say you hit a debug point. I know in the Eclipse where you had the idea of perspective and a particular perspective would get activated during certain special events. I guess this must be something similar.
- Bots - These seem to be some sort of hybrid between source control hooks and integration server robots. I haven’t had a chance to use them yet and I’m not sure I will.
- Source Control Integration - Git has first class integration build right into Xcode. This seems great but I’ll reserver my opinions, I’ve seem crazy things in IDE source control integration in the past and I doubt it’ll be any different here.
Conclusion
Xcode is a vast, vast tool just like any IDE. As I get more experience in it I’ll be able to write posts that go into depth about different elements of it’s functionality.
References
The following are the various links I reference to write the article above. Any links I used throughout the article can be found here.
Feature Image
- Title image based the image “Bird Flying Sky Flight Fauna” from from Pixabay by user allaniversen.
Tips
- The Stackoverflow question - “Moving Files Into A Real Folder in Xcode” as asked by Matthew Frederick